
Summary
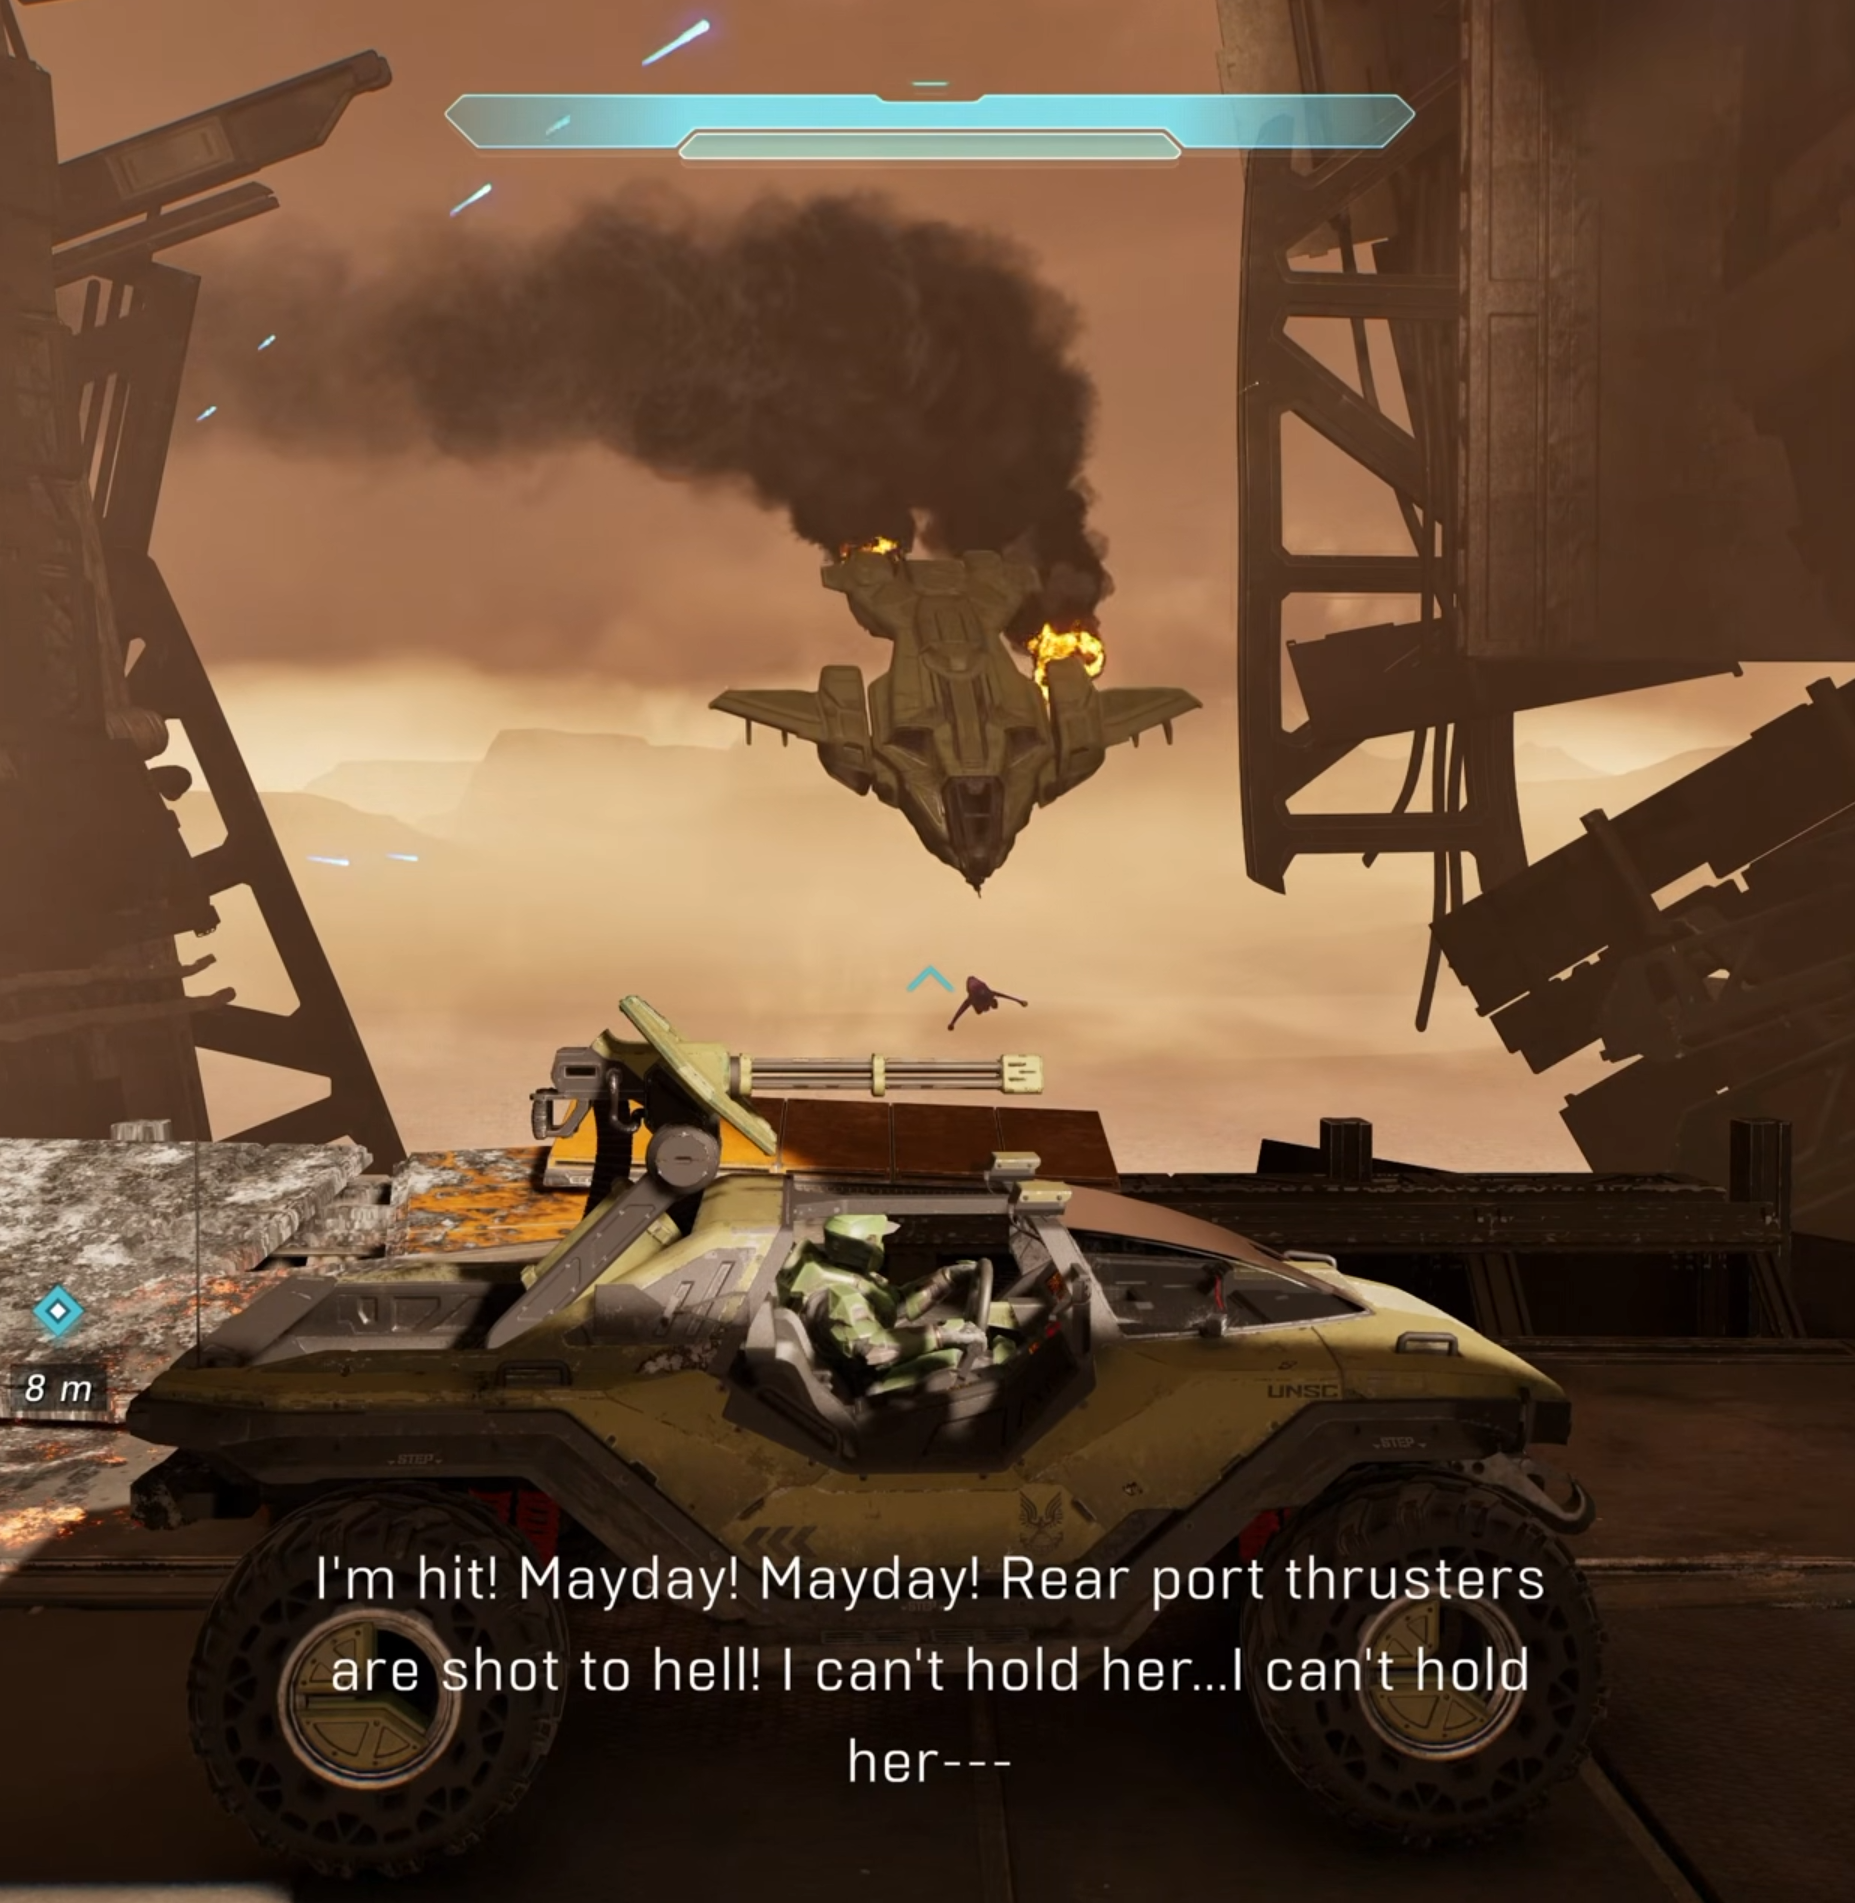
Here is a quick breakdown of one of my key accomplishments while I worked in Halo: Campaign Evolved. I had the opportunity to craft our version of Foehammer’s final flight.
- Created the framework for cinematic in-game vignettes with custom animations, along with its first example, to cover a key narrative moment. Including:
- Custom pawns with control rigs and input handling
- Timing blueprint classes to support cross-disciplinary work
- Defined the multidisciplinary workflow leveraging that framework
- Reduced the time necessary to create this type of content from weeks to hours.
This is a comparison with how that sequence played in the original game.
The workflow I created cut the time necessary to animate vehicle vignettes significantly as they don’t need hand-keyed animations, and allow other disciplines to work with Unreal’s tools. This allowed the team to deliver a higher quality vignette for a key narrative moment than would have been possible otherwise.
The rest of this post is a detailed breakdown of the why, how and what of that workflow.
The Prelude
I authored a multi-disciplinary workflow to enable our team at Halo Studios to quickly create fully animated vignettes in the Stitch engine that Halo Campaign Evolved runs on. I leveraged Unreal’s control rig to create custom pawns, the take recorder to create animations, a custom blueprint class and the Stitch Engine’s API.
As Halo: Campaign Evolved redid the Warthog run in “The Maw” completely. There are content beats that had to remain the same, but the layout, duration, and level of detail were completely different from the original game and the anniversary edition. One of the marquee moments in this level is Foehammer’s final flight. As everything around it had changed, this moment also had to be redone from the ground up.
The Starting Point
After the Maw level had been geo-locked and had gone through a substantial art pass, it was time to try to tackle Foehammer’s final scene. At this point of development, the entire internal team that was working on the project was familiar with the toolset, and how Blam and Unreal liked (and didn’t like) to work together.
Halo: Campaign Evolved’s Stitch Engine makes Unreal responsible for the rendering and Blam for the gameplay logic. This means that AI behaviors, physics, projectiles and gameplay effects (damage, healing, etc.) are handled by Blam, while Unreal renders the meshes, particles, lighting, audio, and so on. More to the point at hand, if something in the world is going to affect the player or enemies, it has to exist in the Blam’s understanding of the world, which is often referred to as Blam’s simulation. On the other hand, if we want something to be visible, it has to be part of Unreal’s simulation.
To put it as concisely as possible, Blam determines what exists, where it is, and what it’s doing, while Unreal determines what it looks and sounds like.
The Goal
This vignette, as the team calls this kind of storytelling content that doesn’t break the player out of normal gameplay, was one of the key storytelling moments in this level. Foehammer is also one of the Chief’s most loyal companions, and she deserved to have the most epic send-off we could give her. The main goal of Halo: Campaign Evolved was to bring the original game’s experience to a new technological standard, and we wanted to reflect that here, for Foehammer.
The Problem Statement
The original plan was to create a highly detailed flight path for Foehammer to follow, coming around the corner and then flying below the bridge, and then offscreen before we hear her meet her unfortunate end. All the while, she should look like she’s on fire, the banshees should look like they’re chasing her. This would have to be done in the mission script, with the expectation that she would be a unit that would have some custom behavior, but mostly operate within a flying unit’s parameters.
This vignette, as the team calls this kind of storytelling content that doesn’t break the player out of normal gameplay, was seen as complex, but achievable. By the time that it came up in the schedule, the team already knew that plan wouldn’t work.
The Stitch Engine
As a result of the Unreal/Blam engine, called “The Stitched Engine” by the team, all animations had to be taken from whatever editing tool produced them, imported into Unreal, then imported into Blam. Then, during gameplay, Blam determines when that animation plays. Unreal renders whatever is being animated into whatever position and state it needs to be in, across almost every visible object in every frame. Units navigate the world and react to it according to Blam’s simulation.
It also meant that all of the unit’s behaviors have to be created and managed with Blam’s systems, using its simulation as the basis, and Blam’s functions as the tools.
The exception to this rule are VFX particles, which will become important later.
All of this means that:
- Foehammer and the Banshees have to exist in Blam, they can’t be “faked” by just existing in Unreal since players could potentially either shoot them or try to jump on them as they flew by.
- All of them have to play an animation that is triggered by the mission’s logic, meaning that they had to exist as Blam assets.
- VFX and Audio, which play in Unreal have to coordinate perfectly with the animation, which Blam triggers.
- Assets and scripts that were used in the original game, or in the anniversary edition, were not usable here.
- When a Blam entity spawns something that’s meant to be rendered by Unreal, that entity will use a blueprint class. This blueprint class is a standard unreal actor blueprint with some Blam-specific components, depending on its purpose.
Flying Navigation
One of the first and most obvious obstacles the original plan faced was the way flying units navigate through the environment in standard Blam. The navigation system was built for much simpler layouts, and the wreckage of the Pillar of Autumn, especially in that section of the level, meant that units couldn’t navigate smoothly through it, let alone perform the kind of maneuvers that were called for by that dramatic moment.
It became obvious that the only solution here would be for something with the visual behavior of a Pelican and a pair of Banshees to play custom animations that would carry them through the vignette.
Timelines, Assets, Resources & Workflows
The other obstacle came as a combination of the calendar, the workload the various teams were tackling, and the estimated time it would take to hand-key the animations for this vignette. Furthermore, even with all the expertise the team had been able to gather up to that point, there was no clear workflow on how to even build it all. The original game used a custom animation as well, played on device machines that used the pelican and banshee models. Device machines are stateful objects that have skeletal meshes attached to them, meant to animate when the mission script triggers them. Most device machines in Halo Campaign Evolved are doors.
All of the technical capabilities were already in the engine, but they hadn’t been pulled together on something like this for decades.
In short, the time it would take to build this with the processes the team was familiar with would take too long. But, the team didn’t want to compromise the quality of this particular narrative moment. And, with the right knowledge, there was another potential solution.
The Solve
The tech design team was tasked with building a highly detailed pathing script that would use the flying navigation functions in the hopes this, with some set dressing, would be good enough.
After some digging through the Blam engine’s source code and correlating other work that I had done using device machines with knowledge of Unreal’s own animation tools, I proposed a different approach:
- Create a new animation for each vehicle using Unreal’s tools.
We could use the Pelican’s skeletal mesh to create an Unreal pawn that moved and animated as a cinematic version of the Pelican while being controlled by a player, and record how it flew through the geo in the level.
What we want to capture with this is the skeletal data in an animation sequence.
- Use each animation in a device machine, backed up by custom blueprints for VFX and Audio hookup.
With some conversion work, we could import that animation into Blam and play it back at run-time. Then, we could use a specialized blueprint actor class to allow audio and VFX to have a greater degree of control over how their assets are triggered than with Blam alone.
With this solution:
- The animation team wouldn’t need to create new assets for this cinematic moment.
- VFX and Audio would have more control over how their assets would be triggered.
- Engineering wouldn’t need to create anything new for this one-time use case.
- We’d have a design-driven workflow for the authoring and iteration of cinematic moments like this.
Custom Pawns
The first step was to take the Pelican and Banshee, and create controllable pawns to represent them during the recording. These pawns have the following components:
- Input consumers
These pawns will be Unreal pawns, and will be hooked up to the Enhanced Input System.
- Skeletal mesh, animation blueprints, control rigs
Any animation behavior that represents mechanical components operating (fins, engine nacelles, etc.) that are meant to twist according to the pilot’s input will be animated through the skeletal mesh, using a control rig component referenced by the animation blueprint. This ABP and CR were created from scratch.
- Floater Movement Component
The movement behavior of the pawns was represented by customized floater movement components, allowing us to use the Chaos physics engine to depict the right kind of “feel” for how each unit should move. This includes the feel of inertia and the “weight” of each machine’s controls..
Creating and Importing Animations
Each flight path that the banshees and Foehammer’s pelican fly during the Warthog run are separate animations. They have to be recorded and processed separately. They’re the main feature of those vignettes, and as such have to be approved by the animation, narrative and cinematic department before VFX and Audio can work on them.
This is the step-by-step process I followed:
- Create a recording stage.
Create a level with Unreal physics turned on, Blam simulation turned off, with the PLA of the Warthog Run in it, and place each pawn at the start location of their performance.
- Plan each shot.
Frame the action from the player’s perspective with timing notes. Pick the timing for each of the dialogue lines.
- Rehearse. Fly through the stage, tune the pawns.
Do test recordings and validate the performance and mechanical animations with the discipline stakeholders.
- Rebase animation using Maya
Certain types of animation playback in Blam expect the root bone of the animated skeletal mesh to remain immobile. Maya provides this functionality through constraints and locators. Separate the root bone of the skeleton’s motion from the pedestal, which must remain at the origin point of the animation, and make sure the rest of the skeleton still animates as intended.
- Reimport into Unreal and create and add it to the Blam Tag’s model animation graph.
Blam will only be able to use animations that are referenced in its tags, and they can only be used in the proper context. Before they’re usable by a device machine, animations have to be imported into Blam. Add the animation to the model animation graph of the skeleton that it’s intended for.
- Create device machine tags using the correct models for each unit’s performance.
Each performance for each Banshee and Pelican needs to have its own device machine. Create the appropriate tags, place them at the intended origin for their respective animation, and the Blam generation process.
At the end of this process, what we had was a set of animations that could deliver the right visual performance at the quality that we wanted.
Timing Blueprints
Animations that are imported into Blam from Unreal can have specific classes of animation notifies attached to them. These animation notifies are converted into frame events, a Blam concept, linked to that specific animation at that specific frame. They’re used amply for weapon events, for example, which had a clear set of categories and applications. This didn’t offer clear workflows for VFX artists or audio designers for this particular use-case.
To cover that gap, I set up the blueprint each device machine spawned on the Unreal side that keeps its own timers. These timers define a window with a start and an end according to the device machine’s internal state, reported to Unreal by an API that had already been defined. This resulted in the following pattern:
- Game logic triggers device machine playback.
- Device machine starts animation and broadcasts out to Unreal that it’s underway.
- Timing blueprints listen to device machine events, and trigger windows defined by VFX and Audio designers as appropriate.
- VFX and Audio is bound to the skeletal mesh being controlled by the device machine through standard unreal components (VFX/Audio emitters)
The end result is that these disciplines could work in a purely unreal context, and trust that their content would be triggered as they intended, even if Blam is in control.
Leave a Reply